Homemade Kozhukattai Flour (Instant Rice Flour for Kozhukattai)

Authentic South Indian Food Creator · Home Chef
Rate this recipe
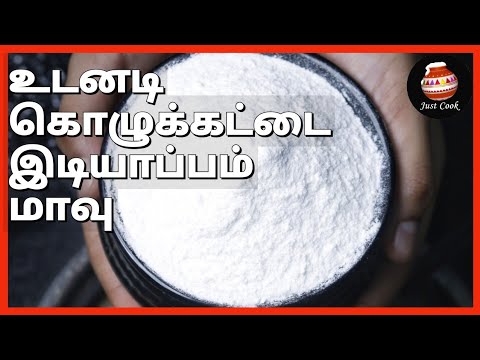
Kozhukattai flour is the foundational base for one of Tamil Nadu's most beloved traditional dumplings — Kozhukattai. Made from raw rice that is soaked, dried, and roasted to perfection, this homemade flour is far superior to store-bought versions. It has been a staple in Tamil kitchens for generations, passed down from grandmothers who knew that the secret to perfect Kozhukattai always starts with the right flour. This flour is also used to make soft, silky Idiyappam, making it a wonderfully versatile pantry essential.
Tamil families absolutely love preparing this flour at home, especially in the weeks leading up to Vinayagar Chaturthi, the grand festival dedicated to Lord Ganesha. Kozhukattai is considered the favourite food of Lord Ganesha, and no celebration is complete without offering plates piled high with sweet Pooranam Kozhukattai and savoury versions. Families come together in the kitchen, soaking rice the night before and filling the house with the warm, nutty aroma of freshly roasted rice flour. It is a ritual as much as it is a recipe.
What makes this recipe truly special is how simple and practical it is. By preparing this flour in a single batch, you can store it for up to 30 days in an airtight container and use it whenever you need soft, smooth Kozhukattai or Idiyappam. The key to success is getting the roasting level just right — low and slow heat ensures the flour is cooked evenly without burning. Use good quality raw rice, dry it completely before grinding, and always sieve for a fine, lump-free flour that gives perfect results every single time.
Looking for more snacks recipes? Browse all vegetarian recipes →
Ingredients(3 items)
Instructions
💡 Tap a step to mark it doneMeasure 2 cups of raw rice (pacharisi) and rinse it thoroughly under running water 2 to 3 times until the water runs clear. This removes any dust or impurities from the rice.
Soak the rinsed rice in enough fresh water for 1 to 2 hours. This softens the rice slightly, making it easier to dry and grind into a fine flour later.
After soaking, drain the water completely using a colander or strainer. Spread the drained rice evenly on a clean, dry cotton cloth or a large plate. Allow it to dry in a shaded area for 30 to 45 minutes. The rice should feel just slightly damp to the touch, not wet — this is called the 'half-dry' stage.
Once the rice has reached the half-dry stage, transfer it to a mixer grinder or dry grinder jar. Grind it in batches to a smooth, fine powder. Do not add any water during grinding. Grind in short pulses to avoid overheating the motor.
Sieve the ground rice flour through a fine mesh sieve into a wide bowl. Any coarse particles that remain in the sieve can be re-ground and sieved again. Repeat until all the flour is fine and smooth.
Heat a wide, heavy-bottomed pan or kadai on low to medium-low flame. Add the sieved raw rice flour to the dry pan without any oil or water.
Dry roast the flour on low flame, stirring continuously with a spatula or wooden spoon. Make sure to scrape the bottom and sides of the pan as you stir to prevent any flour from burning or sticking.
Continue roasting for approximately 10 to 15 minutes on low flame. You will notice the flour changes slightly in colour from bright white to a very light off-white or cream colour. The flour will also start to smell fragrant and nutty — this is the sign that it is perfectly roasted.
To check if the flour is done, take a pinch of flour and roll it between your fingers. It should feel warm, dry, and slightly smooth. It should not feel damp or sticky at all. If it still feels moist, continue roasting for a few more minutes.
Once roasted, remove the pan from the flame and spread the flour on a large plate or tray to cool down completely. Spread it in a thin layer so it cools quickly and evenly. Do not pack it while it is still warm as that will create moisture and lumps.
Once fully cooled to room temperature, transfer the Kozhukattai flour into a clean, dry airtight container or glass jar. Store it in a cool, dry place at room temperature. This flour stays fresh and ready to use for up to 30 days.
To use this flour for Kozhukattai, boil water with a little salt and a few drops of oil, then add the flour gradually while stirring to make a smooth, soft dough. This same flour can also be used to make soft Idiyappam by pressing through an Idiyappam press into boiling steam.
Tips and Tricks
- Always dry roast the flour on the lowest possible flame and stir without stopping — even a minute of neglect can cause the bottom to burn and give the flour a bitter taste that will ruin your Kozhukattai.
- Make sure the rice is only half-dried before grinding, not completely bone-dry. A slight trace of moisture in the rice before grinding helps produce a finer, softer flour that gives Kozhukattai its characteristic soft and smooth texture.
- Store the cooled flour in an airtight glass or steel container rather than plastic to keep it fresh longer. Always use a clean, dry spoon to scoop flour from the container — even a drop of water inside can cause the flour to spoil faster.
Nutrition Info (per serving)
AI Estimated Values per serving
Related Tags